Showing posts with label Childs Birthday. Show all posts

Tea Party for Bella's Dolls

Mini Tea Set, Kid's Crafts, Faber Castell, Ceramic Painting, painting with girls, Tea Party, Cindy Rippe
Painting with Isabella - Ceramic Tea set for her Dolls ©CindyRippe2013
Bella and I spent a few days together this week while her Mom and Dad worked.  We always look forward to doing at least one craft project when we have the time.  I bought this Mini Tea Party kit for her at Christmas and it was the perfect day to work on it.  This photo shows the difference in painting stages from her love of mixing layers of paint on the tea pot to the last pieces painted.  I finally convinced her to slow down a little and help me paint dip-dot flowers on the creamer and sugar bowl.

Everything was included in the kit except for the aluminum foil.  The two days together were perfect since the painted pieces need to dry for 24 hours before baking in the oven.  She knew we'd bake them after school the next day.  We placed the painted pieces on plastic wrap to dry.  The next day we put the dishes on foil on a cookie sheet in a cool oven and turned the oven to 250 degrees. After it reached temperature and then baked we let it cool down inside the oven. 

Mini Tea Set, Painting with girls, Tea party, Faber Castell Mini Tea, Ceramic Painting, American Girl Doll, Cindy Rippe
Bella serves tea to one of her American Girl dolls ©CindyRippe2013

Bella spent a very long time serving her dolls "tea" (water) and Cuties mandarin "oranges".  I found that it was best to let her use a plastic water bottle for refilling the teapot and placed everything inside a large cookie sheet lined with a dish towel.  No spills to worry about!  She used her imagination making up stories to share with her doll friends and even explained how one of them didn't like the tea and would only eat all the foods with "sugar".  She tried to tell her it was junk food but the doll didn't care.  (she was frustrated with that girl!)

Ice Cream Sundae Cupcakes - For Isabella

We celebrated Bella's Birthday this past weekend at The Brown Cow Ice Cream Parlor.  The kids got to make their own sundae, the adults indulged in ice cream cake.  Both desserts got rave reviews and my family was checking out the Chocolate Chip Cookie Ice Cream Sandwiches, that they sell in the store, so I think we'll be back some day.

Sarah and Bella made these cupcakes inspired by Bakerella.  So cute and yummy too!  It was a sweet and special day for our little granddaughter.  Happy Birthday Sweetie!  Love you Much!

The LORD bless you and keep you; the LORD make his face to shine upon you and be gracious to you; the LORD lift up his countenance upon you and give you peace. Numbers 6:24-26

Indoor Summer T-Shirt Project - Great for a Child's Party

After a morning outside in the Summer heat I thought it would be a good idea to have an indoor project  ready for the girls.  Pentel Arts - Fabric Fun Dye Sticks and white T-Shirts were the answer.
This would be a great party activity and becomes the party favor for attendees.  (I just remembered the first time I did this for a party was at Bella's Momma's Baby Shower 4 years ago!)
Fabric Dye Sticks - T-Shirt project - ©2012 Cindy Rippe


It's best to pre-wash the shirts or use an older shirt with stains that you want to cover up.  Prep the shirts by ironing a large sheet of freezer paper inside which will stabilize the fabric and create a smooth surface for drawing.  Then just let the kids draw whatever they want with the Fabric Fun.

I used the Gel Roller Pen for Fabric to write names and add a few simple details (or in Bella's case, helped her write her own name).

These Dye Sticks can be washed out of fabric before they are heat set, if there is a mistake (or they end up somewhere they don't belong), which makes them perfect for kids.  The Gel Roller Pens are permanent immediately so are NOT so good for kids to use on their own but are great with adult supervision.

After the artwork is completed, set the dyes by ironing for a few minutes while the kids eat dessert. (Use a pressing cloth or paper to cover the drawings and protect the iron , use a hot setting - cotton). When the shirts are cool the kids love to peel the paper off and will probably put the shirts on right away!
©Bella's Happy Colors - 2012

A happy heart makes a face cheerful.  Proverbs 15:13

Designer Craft Connection - Bright Floral Decor

This month's theme for the Designer Crafts Connection Blog Hop is Picnic.  A gathering of artificial flowers glued to a styrofoam ball would add a bright pop of color to your party decor. This grouping, from the Chicago Flower and Garden Show, would be perfect for a Wedding Shower or Tween Birthday party. Add a few butterflies on wires and hang a grouping of three or more with ribbon from a trellis or chandelier.  It would also be a great project to brighten up a corner of your enclosed porch for the summer if you don't have time to care for live plants.

 Make sure you hop forward by clicking on the DCC logo in the column on the right or go directly to the next Designer, here. Have fun!

"When bright flowers bloom
Parchment crumbles, my words fade
The pen has dropped ..."
   -  Morpheus


Hello Kitty Party Projects for PreTeens

 As promised here are the details for the Hello Kitty Projects seen in my previous post.
Hello Kitty Journal - Cindy Rippe


I used the Westcott Brand® Titanium Bonded Non Stick Scissors to cut The Duck Brand® Duct Tape Sheets and Tape Rolls and cover the journal.  I folded the tape upon itself to create the tag and attached it to the cover with VELCRO® Brand Hook and Loop Fasteners.  A little bit of ribbon trim and a heart charm add just the right amount of whimsey.
Inside Cover of Hello Kitty Journal with Pocket - Cindy Rippe
After covering the inside cover with the printed duct tape, I made a pocket by leaving most of the backing material on the sheet of duct tape (to allow for a non-stick area).  I decorated the top edge with the printed tape and trimmed the backing away on the sides and bottom edge of the pocket to stick it to the book. 
Mini Hello Kitty Pennant - Cindy Rippe
To make the Mini Pennant I just folded pieces of the printed tape over a length of narrow ribbon and trimmed each into a triangle shape.
Hello Kitty Hair Bow made from duct tape - Cindy Rippe
and finally; I made a small bow from the tape and used a hair clip to attach it to the gift bag.  I cut two slits through white card stock topper and the bag using the Westcott Hobby Knife.   Favor bag decoration and a cute hair accessory in one!
Don't forget to add your comments to the WESTCOTT Brand Blog for your chance to win an assortment of cutting tools.

I was provided with samples from Westcott Brand Cutting Tools, Duck Brand Duct Tape and VELCRO Brand Hook and Loop fasteners for this Blog Hop and enjoyed designing with them all.  Thank you to all the participating sponsors and to Marisa Pawelko Craft Designer & Founder of Modern Surrealist for organizing this project.

Westcott Brand is the official sponsor of the October Designer Crafts Connection Blog Hop! The Non Stick Scissors really did work great with all the adhesives.  I look forward to using them in future projects.  Here's a little information about the Cutting Tools that I used.

Westcott Brand® Scissors are the WORLD’S FAVORITE SCISSORS™ meaning Westcott sells more scissors than any other manufacturer in the world!
Westcott Brand® Titanium Bonded Non Stick Scissors are the BEST Non Stick Scissors on the market that never get stuck and can easily cut through Sticky Back VELCRO®, Duck Tape and multiple layers of fabric and other materials!
Titanium bonded blades are 3 times harder than stainless steel and never need sharpening!
Westcott Brand® Cutting Tools have the best performance! The 3” scissors can even cut through 5 layers of fabric!
Westcott Brand® Cutting Tools are ergonomic and come in several different color options!
 
" Life is not a written book you can pick up and read.
It is a journal waiting for you to fill it's pages." 
Dana Atkin


Hello Kitty Party for Preteens

Hello Kitty Party - Favors and Decor by Cindy Rippe
October's challenge is sponsored by:  

  AND


I went with a girl's party theme this month since I was inspired by all the pink goodies sent for me to design with. This is perfect for a preteen party. They can create the journal as a party activity.

You'll find the project details in this POST and find out how to get your chance to WIN a fabulous collection of  Westcott Brand™ Cutting Tools.


They are providing a giveaway of a deluxe assortment of Westcott Brand Cutting Tools to a random winner who comments on this post during the month of October. Please also show your support by posting comments about this blog hop their Facebook Fan Page!

*Giveaway winner must provide a valid US street shipping address.

Keep hopping to see what the other Designers have created for you!


3rd Birthday Princess Party Theme

Isabella's 3rd Birthday party had a Princess theme.  Surprise, surprise... she's a girl, she's 3, she loves Disney Princesses.  She loves to act out the stories, recruiting willing family members to play the all the parts.  "No...you need to ride in on the horse please."  "You are Prince Phillip, Grandma Cookie is the Queen, I am Aurora" 
She waves her magic wand
Sarah's Mom and Dad really wanted to keep things simple this year.  They served sandwiches, salads and fruit which was perfect for a hot day. We used her Birthday Banner again this year.  (see last year's post)  It has become a nice tradition to use it every year (well, so far - until she reaches that age where it will look too "pretty"  :)
Fruit on Fairy Wand skewers made by Aunt Karen
Favor Bags
 The paper bags with handles that were decorated with Disney Princess Stickers were a hit. A few of the guests continued to call themselves a Prince or Princess after they went home.  Of course everyone got a Glittery Star Wand to create their own magic!
Star Wands from Oriental Trading Co
I decorated with Pom Pom's made from tissue paper and ribbons.  They looked so pretty as a chandelier in the center of the tent. Inexpensive and easy to make too.
Pom Poms hanging inside tent and out.
 The left over scraps of tissue paper tucked into a pink glass bowl and topped with a plastic tiara and jewels worked out great for the inside table centerpiece.
I twisted two squares of tissue together at a time and tucked them in the holes along the edge of the bowl.

For the tables under the tent I used the cases from our Disney VHS tapes, (I guess they're Vintage now)  pom poms, a tiara and a Star Wand.
Close up of the centerpiece and a vintage VHS case.
Prince Cooper peeking from behind a centerpiece.  Isabella cuddles with Suzanne while waking up from her nap.
Blog Parties I'm attending.  Come on over and join me!
HookingupwithHoH


How to repair a Princess Dress

We celebrated the Royal Wedding last month and our Princess is still dressing up each day.  (She has been "all about" Princesses for a long time)  You can see the party in this earlier post. Princess Party to Celebrate the Royal Wedding.

Sometimes the dresses come out of the wash a little worse for the wear.  Yep, did the  gentle cycle, etc, etc, but the seams on this one just shredded away!  Every seam on the top of the dress fell apart.

Repairing a Princess Dress with Fabri-Tac Glue. Cindy Rippe Art in Entertaining
So how can it be fixed?  With LOTS of patience, satin ribbon and my favorite glue - FABRI-TAC by Beacon Adhesives!  Oh....and lots more patience to slowly piece everything back together, one step at a time. The glue actually sets up quickly.  It just that the fabric is so delicate and it took me a while to figure out what part should be glued to another.

There's not enough fabric to sew it back together so I trimmed the threads away, glued and reinforced each seam with Fabri-Tac and then covered the glue and added more strength to the seams by adding a layer of satin ribbon.
Princess Dress shredded fabric on side seams - Cindy Rippe Art in Entertaining
 The ripped seam actually went in three directions for this part.
Side seam of Princess Dress repaired - Cindy Rippe Art in Entertaining
Both shoulders, both side seams were open and part of the waist was open. I glued the tulle on the shoulder seams and the gathered it directly to the edge of the shoulder fabric with no ribbon.

Princess Dress repaired and ready for Princess Isabella - Cindy Rippe Art in Entertaining
Finished!  Ready for another day of imagination and play.  I don't have to worry about the glue holding.  I've used it for years to add trim to tablecloths and napkins.  It dries clear and it's washable.  Now lets see if the rest of the fabric holds up!  :)  (Oh! and no, I didn't get an endorsement for mentioning this product.)

HookingupwithHoH

Princess Party to Celebrate the Royal Wedding

In honor of the Royal Wedding why not let the little girls in your life play dress up?  They love to pretend that they can be a real Princess too.
Princess Dress Up Time - Cindy Rippe
Princess Isabella, Princess Abby, Princess Corina, and Princess Izzy had a wonderful time with the Princess clothes and accessories.
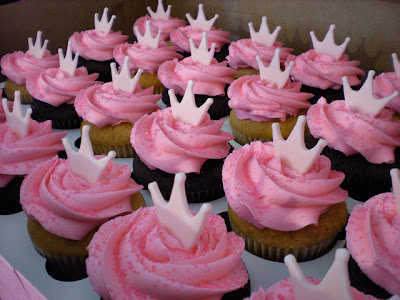
Pink Princess Cupcakes by Sugarbaby's in Houston
Every wedding needs cake!  Pretty pink fondant crowns on pink buttercream and sparkling pink sugar decorate these vanilla cupcakes by Sugarbaby's.

Princess Cupcake Wrapper by Wilton
It would also be fun to let the girls decorate the cupcakes with sprinkles and candies.  You can't go wrong with cake for dessert!


"Every girl can be a princess
Any dream can be
Close your eyes and see
A magic wand and soon you’ve gone
From just you to royalty

You don’t need a grand old castle
Rising in the air
Maids to brush your hair
Your heart is pure, you’re thoughtful
Surely princess, you’re almost there

Why just putting on a tiara
And you aren’t the same old you
My life changed so completely
By just putting on a shoe"


Lyrics from Every Girl Can be a Princess on Disney's Princess Tea Party Album and Cinderella DVD set.


Please join me at these creative blogs:
My Romantic Home
and
The Shabby Nest
and
The Shabby Chic Cottage
Don't forget to check out some of the other blogs while you're there.

Sizzix Triple Play Blog Hop Week 1 - A Dollhouse Tea Party


The first thing I thought of when I saw the 3D house was how cute it would be for a little girl's tea party.  Add mini cupcakes, tiny cookies, a child's tea cup, a demitasse spoon and Isabella's doll. Fun!  I used candy flowers as the inspiration for the design and to decorate the food.  I even made the chair for the doll with a cookie for the cushion and a candy daisy for the seat back. Everything here is tiny.  Perfect for my little granddaughter.  To give you an idea of size, the finished house is 6" tall, the cookies are 1" wide and the doll is almost 3" tall in her little chair.
I decorated mine with a simple pen and ink design and painted the flowers with an acrylic wash.  Since Isabella is all about the "sparkles" right now, I used glitter paint for the roof and trim. There's a little porch and a fence that are also included in the set but I just used the main part.  I put extra cookies and flowers in a cellophane bag, tied them with ribbon and put them in the house as a party favor.
I carried the design around to the back side too.  The design is simple enough that it might make a good project for an older girl's party.  You could base-coat the house and draw the ink lines and the girls could fill in flowers with thinned acrylic paint.

This box would be cute on the dresser for hair bows or other girlie treasures don't you think?  I assembled the house with strong double stick tape but left one side open for access later.

Now that I've inspired you, here's the list of products that I used:

Sizzix Scoreboards Pro Die #656836; - House, 3D, by Eileen Hull 
DecoArt Americana Acrylic paints and Glamour Dust glitter paint
Sakura Pigma Micron Pen #05 - black
Loew Cornell Brushes - I used 1/2" Wash Brush #3550 but you can use an UltraRound or a smaller flat brush if you wish
Candy flowers are called Wilton Icing Flowers
Cookies are Nabisco Mini Chips Ahoy! and Geraldine's Key Lime Cookies.
If you would like inking or painting instructions and pattern for the flowers send an email to:
CindyRippe@gmail.com with Dollhouse Tea Party Floral Pattern in the subject line.  


Now hop on to the next blog and see what creative ideas are waiting for you there!


[ back ] [ Sizzix ] [ forward ]
I also linked this blog to one of my favorite tablescape blogs "Between Naps on the Porch".  You can find the link to that site on the right side of my blog.  Be sure to visit to see other Thursday Tablescapes.

Candy, Polka Dots and Pinwheels

It seems like balancing life lately (what needs to be done and what we want to do) has made it important to keep things simple as possible.  We aren't the only ones going through this I'm sure!  So once again, this time while planning for Isabella's 2nd Birthday, there were a few last minute ideas to dress up the party.  We all agreed that this would be a really simple and casual picnic but you know how it goes....Sarah found some cute polka dot plates and while I was shopping for a few last minute food items I saw the pinwheels.  Next thing you know we are playing phone tag with design ideas. In every call we both emphasized the need to keep it simple,easy for everyone and worked really hard at reigning in our design enthusiasm.  So for those of you that expect "over the top", I'm sorry.  For those of you that just want to see snapshots and ideas of "really easy party ideas", here you go!
I took canning jars, replaced the top with cardboard wrapped in pink crepe paper, and poked a hole in the center for the pinwheel.  Lee helped me count the assorted candies to fill and weight down the jars.  They were so easy and looked really cute on the picnic tables spinning in the wind!  The adults took guesses at how many candies were in the jars and the closest guess won the jar full of candy.  The pinwheels were the favors for the children.  I attached the crepe paper and ribbons with Glue Dots which was very quick and easy.
Balloons tied to the corners of the tent repeated the multicolor polka dot theme.
We used the Isabella's banner from last year, which may end up being a tradition for as long as it holds up. The banner is made from scrapbook papers, cardstock and die cut letters attached to sheer ribbon, again, with Glue Dots products.
I loved the cake with the butter-cream crown and polka dots.  It was filled with fresh strawberries, yum!
Sarah made her "Mini Pink Lemonade" cupcakes and tucked the cake stand into Isabella's tutu from last year's birthday. I love how she does the same thing that I do.  Use what you have already in a different way.
We also had an Ice Cream Sundae bar, which was a hit since it was so hot outside, and Nani's Popcorn cake.  Yep, as usual, too many desserts!  But that means everyone gets to take some home for later!
Happy 2nd Birthday Isabella!  Love You Much!