Showing posts with label Sizzix Blog Hop. Show all posts

Hot Beverage Bar - Follow up for Sizzix Blog Hop Week 7 post

I went through some photos during my Christmas break and found the pictures from the Hot Beverage Bar that I created for the Sizzix Triple Play Blog Hop - Week 7 in a previous post.   I made signs for each beverage with matboard shapes cut out with the Sizzix ScoreBoards XL Die - Treat Bag Toppers that were designed by Eileen Hull.

The signs were simply decorated with a little pen and ink with a wash of color and one thin coat of Craft Twinkles glitter using DecoArt Americana acrylics.  I printed sign on the computer to identify each beverage.  The coffee flavor is Winter Frost  made by Coffee Masters. I'm lucky to have a local resource for specialty and gourmet foods - D'Masti Catering Inc.  They also carry a variety of wonderful Hot Chocolate flavors!
.
Hot Cocoa stays warm in my thrift store find Thermos pot.  You could also fill the Thermos with hot water and offer a basket filled with an assortment of Coffee Masters flavored Cocoa Amore.  (Also available at DMasti.com) my favorite is Chocolate Creme Bruelee)  This tag is easier than the others and I painted the holly berries painted pink to match the pointsettia.  I attached all the labels and ribbon with Glue Dots.
The recipe for the Spiced Apple Cider in the crock pot can be found HERE.  I used a soft chenille fabric (found in the baby section) for the tablecloth because the bumps look like little snowballs.  A green fabric napkin and my snowmen finish the display.

Winter is the time for comfort, for good food and warmth, for the touch of a friendly hand and for a talk beside the fire: it is the time for home. Edith Sitwell


Sizzix Triple Play Blog Hop Week 7 - Hot Beverage Bar Signs

This is the last week for the Sizzix Triple Play Blog Hop, I'll miss playing with all the shapes.  This week I received mat board shapes cut from the Sizzix ScoreBoards XL Die - Treat Bag Toppers designed by Eileen Hull.  So cute!

I decided to use the shapes as signs for my Hot Beverage Bar.  We have a Christmas Light Parade in town every year and after some of the parades I've invited friends and family over for a simple meal.  As they arrive they are greeted with an assortment of hot beverages that are set up as a self service bar and beverage area.

I use a crock pot, insulated "Thermos" coffee pots and my coffee maker to keep the drinks warm since I prepare them before I leave to watch the parade myself.  The only thing left to do when I get back is to switch on the coffee pot.
The Crock Pot holds Spiced Apple Cider. (For the recipe click HERE)  I used a brown permanent pen to sketch a flower and painted it with DecoArt Americana Acrylics.  To match the glitter on the artificial leaf accents I finished the sign with a coat of DecoArt Twinkles Glitter.  I wrapped a ribbon around the crockpot, attached a few glittered leaves, the sign and the oval label with Glue Dots.
The serving ladle rests on a little dish that was originally made for dipping bread in olive oil.  It helps with the drips and the guests feel better knowing where to put it.  Oh!  I also leave the lid of the crock pot off during the party.
A few touches to dress up my Snow Lady pulls the grouping together!  I'm working on more signs so be sure to check back again to see the rest of my Hot Beverage Bar.

Click on the forward button below to continue with the Sizzix Triple Play Blog Hop.


[ back ] [ Sizzix ] [ forward ]

For more tablescapes check out Between Naps on the Porch for a Christmas Tablescape Thursday.

Sizzix Triple Play Blog Hop - Sneak Peek - Treat Bag Toppers

Our challenge this week is to design a project using Eileen Hull's Treat Bag Toppers.
Photo from http://www.sizzix.com/product/2484
They are very cute as originally designed (and I'll use them this way some time in the future) but I'm thinking maybe something a little different for the Blog Hop on Thursday.

I was sent pieces cut from white mat board.  Hereare the shapes I have to work with.
http://www.sizzix.com/home
Yeah!  Love a blank slate to design on.  Check back later to see what I come up with.  Until then check out the creations from last week.  There are great ideas for you.

Snowflakes and Pink - A Feminine Tablescape

This week's project uses the Sizzix Bigz XL Die - Album, Brackets by the talented Brenda Pinnick.  As always; I'm looking for new ways to dress up the table using craft techniques. This is is what I decided to make.  You could also cut out simple frames freehand.
My challenge this time was to work with pink and white card stock die cuts.  I decided that they would be great hanging from the ceiling or chandelier over the table. So feminine and "Wintery" with the crystal glitter.  
 I used a variety of paper punches and decorative scissors by Fiskars to cut snowflakes out of copy paper, ironed all the little folds out, embellished everything with glitter and attached the snowflakes and pre-cut frames to the ribbon.  I used Aleene's Clear Gel Tacky Glue for everything.
Maybe the black background will help.
I used my winter white dishes and pink depression glass.  So sweet!
A pink napkin, accented with one of the snowflakes and tucked inside the cup, acts like a little nest for the tiny ceramic bird.  The bird would be a perfect little keepsake for your guests.
I added interest and different heights to the tablescape by using the ceramic birds on pedestals and a small bowl tucked under the champagne glass filled with cookies.

To do this for your own party please remember:
1. Cut the frames from card stock.
2. It's easier to cut the snowflakes out of thin paper like copy paper.  Anything heavier than that makes it hard to fold.  (How to cut out paper snowflakes)
3. Embellish both sides of the paper.  The idea is to hang the pieces from the chandelier or ceiling over the table.
4. Vary the ribbon lengths.
5. Don't be afraid to make the ribbons (or fishing line works too) really long.  Some should be almost to eye level over the table.  They are delicate and will be turning slightly with the breeze.  They probably won't interfere with the dining experience.
6. Don't get them too close to candles!  :)


This is what the Sizzix Bigz XL Die - Album, Brackets was designed for originally.  Really cute, isn't it? Can you think of creative uses for the die cuts?


Sizzix Triple Play Blog Hop Week 5 - Christmas Cookie Exchange

Mmmmm....homemade cookies, hot chocolate and cold milk!  

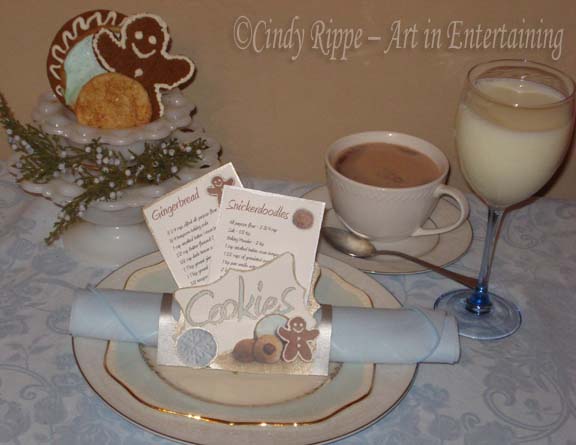
For this week's Sizzix Triple Play Blog Hop challenge I was given gray card-stock cut out in shapes from the Sizzix Bigz XL Die - Gift Card Holder w/Phrase, For You 3-D (Pop-Up) designed by Karen Burniston.  Instructions for assembling the Pop Up Gift Card were very easy to follow.  Click HERE to see them.
I decided to make a napkin holder that also serves as a table favor with cookie recipe cards. (sorry, the metallics didn't photograph very well)
I took pictures of the cookies I made this week and then played in Photoshop to create recipe cards and small images that I printed and cut out of card stock.  I painted the pieces of the Pop Up Card Holder and outlined my own cut outs with Dazzling Metallics acrylic paints by DecoArt.  When everything was dry, I assembled the pieces with Zip Dry Paper Glue by Beacon. (I tucked the two tabs the normally slide through the front of the card underneath to form the napkin ring.)

To host your own Cookie Exchange, invite a few friends to make one dozen of their favorite cookies for each guest that will be attending, plus a few more for tasting.  At the end of the night each guest will go home with a variety of cookies for the holiday season.  Enjoy!

You find cookie recipes in my  previous three posts (1, 2, 3 ) and the Snowflake Sugar Cookies here.

I hope this inspires you to add a special touch to your table and to include Art in your Entertaining!

Click on the forward button below to continue with the Sizzix Triple Play Blog Hop.


[ back ] [ Sizzix ] [ forward ]

I can also be found "Getting My Craft On" at:
TODAY'S CREATIVE BLOG


The DIY Show Off


Making

Sneak Peak #3 - The Sizzix Blog Hop - Week 5

Two clues for the Sizzix Triple Play Blog Hop today.

The first one is....more cookies!
Image by McCormick

Gingerbread Cookies
I've posted a recipe for the cookies right HERE.


I really enjoy seeing all the ideas created by the Blog Hop Designers and truly appreciate the comments about the projects I've created.  Thanks everyone for participating.  I am amazed at some of the ideas and often wonder, "How did they think of that?  So cool!"  Only two more weeks to go after tomorrow!

The second clue is that this week we're working with a Pop Up Gift Card Holder.  Cute idea, I  hope my project turns out as cute as this sample card by Karen Burniston.
Sizzix Bigz XL Die - Gift Card Holder w/Phrase designed by Karen Burniston

 Make sure to check all the designs tomorrow afternoon starting with Amy Anderson and keep clicking all the way through to Vicki O'Dell.  There are over 50 Designers and 5 weeks of projects to inspire you.  Don't forget to come back here though!

Cookies and Sneak Peek #2 - Sizzix Triple Play Blog Hop - Week 5

Here's the 2nd hint about my project for this week's Sizzix Triple Play Blog Hop.  For the first clue (if you missed it yesterday).  Click HERE.
Sneak Peek #2

 Peanut Butter Kisses!  Yummy chocolate on a chewy peanut butter cookie!  They are easy to make and great for gifts.  If you want them for a special occasion; make extras.  They are DELICIOUS warm!  You'll find the recipe here.

So.......what do these cookies have to do with a Blog Hop challenge with Sizzix die cuts?  Come back tomorrow for another hint!

Cookies and Sneak Peek #1 - Sizzix Triple Play Blog Hop - Week 5

I'm working on the Sizzix Triple Play Blog Hop project for this week and thought you might a few hints to see what I'm making.  (no.....not the cookies....they are just a clue)  Here's the first clue -
Sneak Peek #1 
Snickerdoodles!  Really simple cookies that are a little crunchy on the outside and soft on the inside.  You just mix up the dough, roll it into balls and coat with a mixture of cinnamon and sugar.  Yummy goodness!  For the recipe click here and come back tomorrow for another hint.

Thanksgiving Tablescape

I hope you had a wonderful Thanksgiving!  We sure did. A cozy evening with family and friends gave us much to be thankful for. Sarah and her Mom, Mary, prepared a delicious meal. The traditional family favorites that Tawn (Broccoli, Rice and Cheese) and Nani (Broken Glass - jello) added to the menu rounded out a feast that we all enjoyed.  My job was decorate and bring salad and cake.

The table's almost ready.  Sorry, I got busy helping and visiting and I forgot to go back for more pictures.
We alternated bowls and plates for the salad.  By mixing the limited amount of brown glass with clear we still got a nice look.  The Johnson Brothers Windsor Ware plates (heirlooms from Sarah's family) have an assortment of fruits and flowers on them.
The roses (they were actually more Rust than Red) matched the flowers on the dinnerware almost exactly.
The inspirational Thanksgiving sign that I made for the Sizzix Triple Play Blog Hop looked very nice with the colors of the dessert and the bronze antique mirror frame.  (It's so great when things work out the way you imagine them to!)  I often display the beautiful desserts on a side board as part of my party decor.
Isabella and Nani (Great Grandma) check to make sure the Chocolate Fudge Cake was O.K. to serve for dessert.  Bella LOVES "choc-o-late".  We love to hear her say it.  :)  She decided she would like to eat cake first before the meal.  That's my girl!  She waited patiently until after dinner though.

For more beautiful tablescapes, many that are more elaborate than mine, check out Tablescape Thursdays at Between Naps on the Porch. 

Sizzix Triple Play Blog Hop Week 4 - "Pause and Give Thanks"

Happy Thanksgiving!  I had fun creating a sign for the dessert table using the Sizzix ScoreBoards Pro Die - Frame and Frame Back w/Stand  by Eileen Hull. Of course, there will be many more desserts than my one chocolate cake at Jason and Sarah's house!


There's a nice set of instructions for assembling the original frame and design here. I chose four parts of the frame set, silk leaves in fall colors and painted them with a variety of metallics and glittter paints.
I used brads and gold ribbon to attach the leaves to the sign and assembled the pieces with hot glue.

For those of you following my napkin experiments this week (see previous posts) this is my final selection.
I used the Silverware Roll fold and attached one of the painted leaves with gold ribbon to close it.  Instead of placing flatware inside the roll I printed a Thanksgiving Day poem and used that as a party favor.

I'll post pictures of the project in the Tablescape tomorrow.  Come back after you've finished shopping and eating the leftovers to see how it turned out.

You can click on the link below to continue with the Blog Hop and to see what the other Designers have created.  Or, go directly to the Sizzix Triple Play Blog Hop site to see the list of participating designers.


[ back ] [ Sizzix ] [ forward ]

Autumn Napkin Folds: Chocolate Brown and a Sneak Peek

I have these beautiful, large Chocolate Brown napkins.  I showed you the French Fold (also called the Classic Three Point Fold) with one of the last yellow roses of the season in a previous post. Click here to see it.
I replaced the Yellow Rose with Pin Oak leaves and a simple knot of satin ribbon.
This is called a Diamond Arrow fold.  I tucked the bottom point back and under to create a straight edge.  I think the bright orange Maple leaves look so pretty against the brown.  I alternated the direction of each leaf to create a little interest and allow the colors to show.

Tomorrow is the 4th week of the Sizzix Triple Play Blog Hop!  Here's a Sneak Peak!  You won't want to miss all the creativity!

Sizzix Triple Play Blog Hop Week 3 - "Celebrate" Pennant Banner

Here we are at Week 3 of the Sizzix Triple Play Blog Hop.  I made a multi-purpose Pennant Banner.  You could use this design for Birthdays, Showers or Spring Parties.  It would also be cute in a child's room with the letters of their name.
Our challenge, this week, was to create something with pieces cut using the Sizzix Flower, Beauty Bloom, Originals Die #655455 by Brenda Pinnick. 
I received this package of pre-cut flower shapes. My kit included Felt, Fabric and Card Stock. (Although I didn't use it yet, isn't the Pink Striped Fabric adorable? Not only did Brenda design the Die shape she designed this fabric as well!)  
To create the pattern I designed the basic pennant shape and letters and then traced the cardstock die cuts to draw the flower shapes. I cut out 9 pennant shapes from white fabric and used a light box to draw the design on each pennant with the Pentel Fabric Pen.
I used the DecoArt So Soft Fabric Paints to fill in the shapes.  In addition to the basic colors, there are Glitter and Pearl paints which add some glitz to the design.
After the base colors were dry I added strokes of the Pearl and Glitter paints on the large flowers and each letter.  I also painted some of the card stock and felt flowers with the Pearl paints.

I used the Fabri Tac to glue the banner and flowers together and Gem Tac to adhere the buttons.


Here's my Supply List with links to the sources:
Sizzix Flower, Beauty Bloom, Originals Die #655455 by Brenda Pinnick
Sizzix Big Shot
Felt – National Non-Wovens
DecoArt So Soft Fabric Paints
Pentel Gel Roller Pen for Fabric
Loew-Cornell Round Stroke Brush
Beacon Adhesives - Fabric Tac and Gem Tac
Sew Classic Bottomweight- Rodeo Cotton Solid White Fabric
Sheer Ribbon and Vintage Pearl Buttons from my stash

Have fun looking at all the creative ideas on the rest of the Hop!


[ back ] [ Sizzix ] [ forward ]