Showing posts with label Cookies and Candy. Show all posts

Valentine's Day Dessert Eye Candy


I've been eating healthy for the last 18 months.  Oh... we still eat dessert around here but not too often.


After a visit to Bakerella's website this morning I just got a little lost while web surfing for more creative Valentine's Day desserts and thought you'd like to join me on my Pinterest Board - Valentine's Day Desserts. 

The talent and creativity in food just amazes me!  Love it!  While these desserts make my love of pink happy, if I'm going to actually eat a dessert my favorite is chocolate.  Almost any type of chocolate :)

I've shared a few simple Valentine's Day desserts in the past. You might remember my Valentine's Day Treats and Easy Valentine's Treats posts from last year.

Have you created a fabulous dessert that you'd like to share?  Please do!  I can always use a little Eye Candy.  It has fewer calories than the real thing.

There is nothing better for a man than that he should eat and drink, and make his soul enjoy good in his labour. This also I saw, that it is from the hand of God. Ecclesiastes 2:24

Daffodils for Valentine's Day


Well...who says that a Valentine's Day Tablescape needs to include Pink and Red?  I was feeling desperate for a touch of Spring after our trip to Sid's Greenhouse and pulled out my Daffodil Altered Book.  I created the design one year after seeing a few of my daffodils "kissing" between the fence in the yard.
 I glued several pages together and cut out heart shapes with a craft knife.  1. Rubber stamped letters on a sheet of clear acetate is glued between the pages.  2. The back side of the large heart showing the pages of the book.  3. The daffodil sketch was painted with water color, colored pencil and inked lines. A few pieces of Scrapbook paper, my garden statue photo, ribbon and a tassel decorate the rest of the piece.  It's designed to sit on an easel which works out nicely for a tablescape centerpiece.
I wanted to tie the napkin with raffia but didn't have any so I improvised with embroidery floss.
1. Accordion fold the napkin. 2. DMC brand embrodery floss. 3. Spread the skein of floss into a circle.
4. Slip it on to the end of the folded napkin.  5. Twist and wrap it around one more time. 6. Adjust the threads if needed. 7. Tuck a few flowers into the floss napkin ring.
I can't forget the cookies!  They are made using the Nestle Toll House Chocolate Chip Cookie recipe but I used Peanut Butter chips and Mini Chocolate Chips mixed together.  "Deelicious!" as Isabella would say.

For more Valentine's Day Tablescapes visit this week's Tablescape Thursday at  BETWEEN NAPS ON THE PORCH.  Beautiful!


I'm partying with CRAFTY CHICA for her Saturday "Post Your Craft" Link Party.Check it out!
Oh...for those of you that can't imagine a Valentine's Day Tablescape without pink I found out that there are several varieties of Pink Daffodils.  Who knew??
Daffodil 'Chromacolor'


Finished On the 15th Blog Hop
Today's Creative Blog

Trends on Tuesdays - Words

I'm working on new painted and stitched designs for kitchen, entertaining and holidays. My designs are inspired by words and inspirational quotes and I'm certainly not alone!  (see end of post for cookie info)

Another Designer friend is inspired by words to create her art and loves to research the meaning of the word, the feeling it conveys and additional words to get a message across.  KELLY HOERNIG, says; "I have to create and words are an important part of the inspiration. Discovering new "out of the box" ways to put the two together are always a challenge for me. I want to take you on an artistic journey so you can discover your own imagination by seeing things differently and through my eyes."   
 Peace Art - copyright Kelly Hoernig

While not a new trend, the use of words and inspirational quotes is incredibly popular in home decor, stationery and design right now.  Maybe it's the need for hope and happiness in our society, maybe it's the new year and a need for change, or just the desire to make your feelings known.  Whatever the reason; my Trend research this month allowed me to find several wonderful ways for you to get your own message across.


Left to Right:  Pottery Barn Comfort Food , DaySpring Life Collection , DaySpring Ever Grateful Collection 

Oh!  2 year old Isabella and I made the cookies at the top of this post using Sillycone molds.  Even though the cookie weren't perfect, (someone got a little zealous and overfilled the molds) we had a great time making them.  I like making ice cubes with the molds for parties to really personalize the decor.
I do have a few of the molds left in stock.  If you're interested in purchasing a set, email me for information at: CindyRippe@gmail.com or watch for them in my CHERISHED STUFF shop .  What words would YOU create with them?

May the words of my mouth and the meditation of my heart be pleasing in your sight, O LORD...Psalm 19:14


Look for me on the FAVECRAFTS Blog Hop!  You'll find lots of inspiration there.

Sweet Christmas Joy from Bakerella

I'm a big fan of Bakerella.  Her delightful Cake Pops and blog just make me so happy!  I was reading her blog today and she shared pictures from her friend "Cupcake Julie's" Christmas party again this year.  I'm glad I took a few minutes to see what she's up to.  I needed something to get me out of a bad mood.  (You know, one of those days when you know you shouldn't be complaining about things but you just can't help yourself!) 

If you need a little touch of "Happy" too you'll want check out her blog.

Last year's party - December 2009.  I love the sugar cookies, the signs on the dessert buffet, and well... everything!  Wonderful pictures!
http://www.bakerella.com/candyland/
Tablescape from this year's party. December 2010.
http://www.bakerella.com/sweet-soldiers/

Enjoy!

Sizzix Triple Play Blog Hop Week 5 - Christmas Cookie Exchange

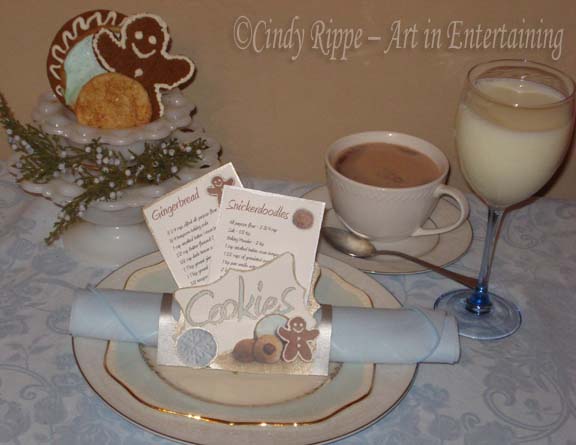
Mmmmm....homemade cookies, hot chocolate and cold milk!  

For this week's Sizzix Triple Play Blog Hop challenge I was given gray card-stock cut out in shapes from the Sizzix Bigz XL Die - Gift Card Holder w/Phrase, For You 3-D (Pop-Up) designed by Karen Burniston.  Instructions for assembling the Pop Up Gift Card were very easy to follow.  Click HERE to see them.
I decided to make a napkin holder that also serves as a table favor with cookie recipe cards. (sorry, the metallics didn't photograph very well)
I took pictures of the cookies I made this week and then played in Photoshop to create recipe cards and small images that I printed and cut out of card stock.  I painted the pieces of the Pop Up Card Holder and outlined my own cut outs with Dazzling Metallics acrylic paints by DecoArt.  When everything was dry, I assembled the pieces with Zip Dry Paper Glue by Beacon. (I tucked the two tabs the normally slide through the front of the card underneath to form the napkin ring.)

To host your own Cookie Exchange, invite a few friends to make one dozen of their favorite cookies for each guest that will be attending, plus a few more for tasting.  At the end of the night each guest will go home with a variety of cookies for the holiday season.  Enjoy!

You find cookie recipes in my  previous three posts (1, 2, 3 ) and the Snowflake Sugar Cookies here.

I hope this inspires you to add a special touch to your table and to include Art in your Entertaining!

Click on the forward button below to continue with the Sizzix Triple Play Blog Hop.


[ back ] [ Sizzix ] [ forward ]

I can also be found "Getting My Craft On" at:
TODAY'S CREATIVE BLOG


The DIY Show Off


Making

Sneak Peak #3 - The Sizzix Blog Hop - Week 5

Two clues for the Sizzix Triple Play Blog Hop today.

The first one is....more cookies!
Image by McCormick

Gingerbread Cookies
I've posted a recipe for the cookies right HERE.


I really enjoy seeing all the ideas created by the Blog Hop Designers and truly appreciate the comments about the projects I've created.  Thanks everyone for participating.  I am amazed at some of the ideas and often wonder, "How did they think of that?  So cool!"  Only two more weeks to go after tomorrow!

The second clue is that this week we're working with a Pop Up Gift Card Holder.  Cute idea, I  hope my project turns out as cute as this sample card by Karen Burniston.
Sizzix Bigz XL Die - Gift Card Holder w/Phrase designed by Karen Burniston

 Make sure to check all the designs tomorrow afternoon starting with Amy Anderson and keep clicking all the way through to Vicki O'Dell.  There are over 50 Designers and 5 weeks of projects to inspire you.  Don't forget to come back here though!

Cookies and Sneak Peek #2 - Sizzix Triple Play Blog Hop - Week 5

Here's the 2nd hint about my project for this week's Sizzix Triple Play Blog Hop.  For the first clue (if you missed it yesterday).  Click HERE.
Sneak Peek #2

 Peanut Butter Kisses!  Yummy chocolate on a chewy peanut butter cookie!  They are easy to make and great for gifts.  If you want them for a special occasion; make extras.  They are DELICIOUS warm!  You'll find the recipe here.

So.......what do these cookies have to do with a Blog Hop challenge with Sizzix die cuts?  Come back tomorrow for another hint!

Cookies and Sneak Peek #1 - Sizzix Triple Play Blog Hop - Week 5

I'm working on the Sizzix Triple Play Blog Hop project for this week and thought you might a few hints to see what I'm making.  (no.....not the cookies....they are just a clue)  Here's the first clue -
Sneak Peek #1 
Snickerdoodles!  Really simple cookies that are a little crunchy on the outside and soft on the inside.  You just mix up the dough, roll it into balls and coat with a mixture of cinnamon and sugar.  Yummy goodness!  For the recipe click here and come back tomorrow for another hint.

Sizzix Triple Play Blog Hop Week 1 - A Dollhouse Tea Party


The first thing I thought of when I saw the 3D house was how cute it would be for a little girl's tea party.  Add mini cupcakes, tiny cookies, a child's tea cup, a demitasse spoon and Isabella's doll. Fun!  I used candy flowers as the inspiration for the design and to decorate the food.  I even made the chair for the doll with a cookie for the cushion and a candy daisy for the seat back. Everything here is tiny.  Perfect for my little granddaughter.  To give you an idea of size, the finished house is 6" tall, the cookies are 1" wide and the doll is almost 3" tall in her little chair.
I decorated mine with a simple pen and ink design and painted the flowers with an acrylic wash.  Since Isabella is all about the "sparkles" right now, I used glitter paint for the roof and trim. There's a little porch and a fence that are also included in the set but I just used the main part.  I put extra cookies and flowers in a cellophane bag, tied them with ribbon and put them in the house as a party favor.
I carried the design around to the back side too.  The design is simple enough that it might make a good project for an older girl's party.  You could base-coat the house and draw the ink lines and the girls could fill in flowers with thinned acrylic paint.

This box would be cute on the dresser for hair bows or other girlie treasures don't you think?  I assembled the house with strong double stick tape but left one side open for access later.

Now that I've inspired you, here's the list of products that I used:

Sizzix Scoreboards Pro Die #656836; - House, 3D, by Eileen Hull 
DecoArt Americana Acrylic paints and Glamour Dust glitter paint
Sakura Pigma Micron Pen #05 - black
Loew Cornell Brushes - I used 1/2" Wash Brush #3550 but you can use an UltraRound or a smaller flat brush if you wish
Candy flowers are called Wilton Icing Flowers
Cookies are Nabisco Mini Chips Ahoy! and Geraldine's Key Lime Cookies.
If you would like inking or painting instructions and pattern for the flowers send an email to:
CindyRippe@gmail.com with Dollhouse Tea Party Floral Pattern in the subject line.  


Now hop on to the next blog and see what creative ideas are waiting for you there!


[ back ] [ Sizzix ] [ forward ]
I also linked this blog to one of my favorite tablescape blogs "Between Naps on the Porch".  You can find the link to that site on the right side of my blog.  Be sure to visit to see other Thursday Tablescapes.

Candy, Polka Dots and Pinwheels

It seems like balancing life lately (what needs to be done and what we want to do) has made it important to keep things simple as possible.  We aren't the only ones going through this I'm sure!  So once again, this time while planning for Isabella's 2nd Birthday, there were a few last minute ideas to dress up the party.  We all agreed that this would be a really simple and casual picnic but you know how it goes....Sarah found some cute polka dot plates and while I was shopping for a few last minute food items I saw the pinwheels.  Next thing you know we are playing phone tag with design ideas. In every call we both emphasized the need to keep it simple,easy for everyone and worked really hard at reigning in our design enthusiasm.  So for those of you that expect "over the top", I'm sorry.  For those of you that just want to see snapshots and ideas of "really easy party ideas", here you go!
I took canning jars, replaced the top with cardboard wrapped in pink crepe paper, and poked a hole in the center for the pinwheel.  Lee helped me count the assorted candies to fill and weight down the jars.  They were so easy and looked really cute on the picnic tables spinning in the wind!  The adults took guesses at how many candies were in the jars and the closest guess won the jar full of candy.  The pinwheels were the favors for the children.  I attached the crepe paper and ribbons with Glue Dots which was very quick and easy.
Balloons tied to the corners of the tent repeated the multicolor polka dot theme.
We used the Isabella's banner from last year, which may end up being a tradition for as long as it holds up. The banner is made from scrapbook papers, cardstock and die cut letters attached to sheer ribbon, again, with Glue Dots products.
I loved the cake with the butter-cream crown and polka dots.  It was filled with fresh strawberries, yum!
Sarah made her "Mini Pink Lemonade" cupcakes and tucked the cake stand into Isabella's tutu from last year's birthday. I love how she does the same thing that I do.  Use what you have already in a different way.
We also had an Ice Cream Sundae bar, which was a hit since it was so hot outside, and Nani's Popcorn cake.  Yep, as usual, too many desserts!  But that means everyone gets to take some home for later!
Happy 2nd Birthday Isabella!  Love You Much!

Easter Tablescape in Pink & Green

Our elegant Easter Tablescape this year was created on a budget with easy DIY projects. I thought it would be fun to share it, along with the other creative tablescapers, at Between Naps on the Porch for my first Tablescape Thursday.

Sarah originally wanted pink tulips in silver mint julep cups but they were hard to find and out of our price range.  We went with a pink and green theme and used what we had on hand (with a few changes of course!) and got lucky with a last minute clearance sale for the napkins. 
We were able to squeeze 14 at the table using folding chairs along the sides to save space.  I made the runner using $4.00 clearance fabric.  The edges were hemmed with iron on fusible web.  I had planned on making matching napkins but 1/2 price was too hard to resist so I bought them instead!  I'll make the napkins later with the extra fabric.
A $10.00 bunch of pink tulips from the grocery store tucked into Mom's soup tureen.
 
Here's a close up of the painted plates.  The napkins are folded in thirds and draped across the plate to carry the green over the edge of the table.  Sarah made the bird's nest cookies which were perfect to tuck into the salad bowls as a party favor.
                          
The butter dish and salt and pepper shakers gave us our touch of silver.  My white ceramic bowls and garden birds pulled the look together.  I like how the embossed pattern on the bird looks with the paisley print.
Yummy homemade dessert buffet.  The folding three tier server, extra napkins and more of the white ceramic accents.  Sarah made carrot cupcakes with cream cheese frosting, lemon pound cake and chocolate ganache frosted cupcakes.